People and Place
Saturday, 29 December 2012
Project: Space and light
The high contrast is obtained due to the bright light from the door which creates dark shadows in parts of the room.
Light from a smaller window could create a chiaroscuro effect which causes even greater contrast – see Michael Freeman’s ‘The Complete Guide to Light and Lighting in Digital Photography’. Here he states that the degree of contrast used in an image depends on three things:
· The amount of detail required in the shadows.
· The graphic design of the image.
· The atmosphere of the image
So using the light available at different times of day can change any of these three factors. Also the use of artificial light would affect the contrast.
The section ‘Lighting Spaces’ in the book is useful in describing what should be considered when making a lighting plan. The plan will usually involve different light sources. These could be from existing tungsten or fluorescent lighting, additional photographic lighting, flash, reflectors etc. as well as natural light from windows / doors. Obviously, before making a plan, the space needs to be assessed and the amount of contrast required.
Norman McGrath echoes the requirements for the lighting plan in ‘Photographing Buildings Inside and Out’ and emphasizes that the existing lighting should be assessed on a preliminary visit – it may be necessary to replace inoperative lamps or mismatched fluorescent tubes. Window blinds and / or curtains should be checked. He considers the types of available light:
Daylight changes throughout the day, not only with direction, but also intensity. Direct sunlight entering a space may or may not be welcome, depending on the type of image required, so the shoot may have to be rescheduled to suit the type of daylight.
This could be an area where HDR imagery would be used usefully, but for the sake of the exercise I won’t consider it.
Tuesday, 4 December 2012
Exercise 3.02 – The user’s viewpoint
This exercise will be a little more difficult to progress. Looking for spaces where particular activities are undertaken isn’t difficult, but I think that gaining permission to take photographs may be more difficult.
Places that spring to mind are:
· Primary schools – where the height of the users will be low
· Swimming pool – where the height of the user will be at water level
· Churches – where the height could be that of the preacher or that of the congregation
· Auction mart – is the user in the ring or looking down to it?
· Restaurants – the user would be seated at a table
While the first four are appealing, gaining permission may be a problem, but they’re interesting ideas.
The first venue I was able to gain permission was the local cattle auction mart. I decided to use two cameras – the D200 with 10 – 20 mm sigma lens and the D300s with the 18 – 200 mm lens. I set them both for automatic ISO as I knew the lighting would be low and I wanted to catch people in the views without too much movement blur. Flash wasn’t an option as it would be distracting for the animals and, more importantly, the auctioneer. Using two cameras enabled quicker changes during the fast action of the sale.
I wasn’t allowed into the pens or auction ring. Neither could I use the auctioneers’ position, so I assumed the viewpoint of the buyer in the pens area and the observer for the main ring (taking care not to make any movement which could be construed as a bid!)
The market was an experience in itself. Seeing the stock movement, listening to the bantering of the farmers and the overall excitement of the auction are to be savoured. The stock holding pens were useful for collecting stock images of livestock, but not suitable for this part of the course, so the first image I’m using is of the sale of sheep in the auction pens.
There are three buildings holding the auction pens, selling different types of animals in differing types of pens. I elected to use the sheep pens as the light was better, there were more in use and I had more opportunity to take images.
D200, ISO 1600, 12 mm (18 mm equivalent 35 mm), f/6.3, 1/45 sec.
Positioning myself so that I could get a good view of the pens, buyers / sellers and the auctioneers I decided a landscape orientation would be best. This would encompass a significant part of the building rather than accentuating the sheep.
The users in this area are the buyers / sellers so this is the position I used. This view shows their viewpoint with the auction pens, the auctioneers’ walkways and the general layout of the building. It’s unfortunate that some of the buyers are facing away from the camera but this is inevitable in this situation.
Due to the high ISO I had to use noise reduction software (Nik Dfine 2) and some burning to reduce the glare from the skylights.
I think I’ve produced an image which shows prospective buyers / sellers what they can expect from this part of the market.
The next image is of the main auction ring, where animals are brought in from the stock pens in small batches so they can be paraded for the buyers who gather round the ring. Sellers and observers are seated on higher tiers, which is where I positioned myself.
D200, ISO 1600, 11 mm (16 mm equivalent 35 mm), f/6.3, 1/40 sec.
For the second venue I used the ‘Inspired By’ gallery at the Danby Moors Centre. This is a purpose built building with side galleries leading from the main area. It’s tempting to photograph it from the raised walkway, but to be at the viewing level I ignored that.
For this exercise I used the D300s, with the 10 – 20 mm and 18 – 200 mm lenses. As I was not anticipating any people in the area (very quiet this time of year) and the lighting was good, the ISO was left at 200 and I used a tripod.
The exhibition was a 60th anniversary celebration of the North Yorkshire Moors National Park with images from various photographers over the period – not particularly good compared to modern techniques, but interesting to see.
D300s, ISO 200, 10 mm (15 mm equivalent 35 mm), f/22, 1/3 sec.
I used the self-timer on the camera and included myself in the images to make it look ‘in use’.
The user level for this area is designed around 5 ft 6 in, so that’s how I set the camera on the tripod. The drapes below the high level windows diffract the light so there’s little burnout in this side of the display area. I wanted to use the wooden structures as a feature in the images and the wide angle lens worked well for this, using the recessing lines to accentuate the size of the room.
I removed the lens distortion in the verticals using the perspective command in Photoshop.
D300s, ISO 200, 10 mm (15 mm equivalent 35 mm), f/22, 0.8 sec.
With the camera at the same height and positioned at the other end of the room, there’s a better appreciation of the raised walkway and more of an impression of the size of the space. Many exhibitions have more 3D objects which can be displayed on these tables.
My third venue is an unused 12th century church. The grounds are still consecrated (many of my ancestors were buried there) and the church is maintained by a group of volunteers.
I was thinking about using it for the next exercise, but there’s no lighting and the windows are on the South side, so there’s very little change in light direction (particularly at this time of year when the sun doesn’t rise in the sky very much) When you consider that the images were taken around midday, you’ll see that the light is coming from a fairly low angle even then. There’s no electricity in the building (the organ still uses foot operated bellows), therefore no chance of using lighting. So I decided to use it here.
For this set I’ve again used the D300s with the 10-20 mm lens and used only natural lighting. I took images with the 18 – 200 mm lens but haven’t used them here as I felt the wider lens gave better interpretations of the building.
D300s, ISO 200, 10 mm (15 mm equivalent 35 mm), f/22, 1/13 sec.
The first view is as seen by the preacher from the three tier pulpit. This is at a raised level from the ground floor pews (these are all numbered and would have been allocated to specific families), but below the balcony.
This image is generated from 3 bracketed exposures, using HDR. The verticals were corrected using the perspective command in Photoshop.
The image gives an impression of what the preacher’s view would have been like.
D300s, ISO 200, 10 mm (15 mm equivalent 35 mm), f/22, 1/10 sec.
This is the view that the organist would have had. Here the viewpoint is higher still and shows nearly all of the boxes of pews (there are more behind the organist and on the ground floor underneath). This image shows the unusual three tier pulpit well. The light from the window creates lighter areas on the balcony – this is where the low angle of the sun is evident.
It’s another HDR image with perspective correction.
D300s, ISO 200, 10 mm (16 mm equivalent 24 mm), f/22, 1/13 sec.
The final image in this series is from the viewpoint of a member of the congregation from his seat in the pews. This again shows the pulpit well and also the organ on the balcony. It doesn’t show the seating upstairs, or the altar, but it does show what a church member would have seen. I like it for its simplicity and austerity. It’s a place of worship, but not worship of opulence which has become the norm in many C of E churches. There’s ‘honesty’ to the place.
It’s another HDR image with perspective correction.
I’ve been surprised how difficult this exercise has been – not by the photography, but by the difficulty in finding venues with specific viewpoints. Having found these venues it’s been interesting to see how the interpretation of the spaces can differ depending on the position of the user. Now that I’ve seen the potential in these places I intend to go back to look at them again – particularly the mart and the church.
Sunday, 25 November 2012
Exercise 3.01 – Exploring function
I started this exercise working backwards – looking first of all at the venues that are available to me. We’re really quite provincial here, so larger public venues are not easily accessible.
· I considered the local co-operative supermarket, for which I attained permission to take photographs, but looking at the building, the opportunities of a position to take a meaningful image eluded me – lots of aisles or rows of checkouts, but nowhere that would show the ‘function of the building as a whole. Just may individual separate areas.
· The visitor information centre was another option and while there was potential to get the image, the permission wasn’t granted (too much ‘jobsworth’ attitude)
· The florist looked like a good venue, but although I had permission the girls were just too ‘silly’ about their appearance.
· There’s a specialist knitting supplies shop in a converted Baptist church, selling unusual and rare yarns, traditional patterns etc. which I thought may provide a good venue and although I obtained permission to take photographs, I couldn’t find any one position which portrayed the function of the building. Putting several images in a collage may have been an option, but I don’t think that’s what this exercise is all about.
I decided eventually to use the local delicatessen for the project – if they refused permission they’d be in danger of losing a good customer, so that should be straightforward enough.
So what is the function of the building?
· It needs to display its wares
Dried fruits, cheeses, coffees, teas, breads, pickles, sauces etc.
Environmentally friendly clothing, accessories (it’s a very PC shop)
· Provide a pleasant experience for the customer.
Easy atmosphere
Easy knowledgeable staff
· Toward the back of the shop is a tearoom which provides respite from the shopping, using the wares from the shop, but I decided not to include this in the photograph, as it is run a separate business.
This business has been trading for years and using its specialized brands and products and trendy ‘hippy’ assistants the equation seems to work well. It can seem a little cluttered when entering the shop, but why change something that works?
Having gained the necessary permission I set about taking the image:
Travelling as light as possible, to be less intrusive in the relatively small area, I took one camera (Nikon D300s) and two lenses (18 – 200 mm and 10 – 20 mm). I didn’t want to use flash as it would be a distraction in such close proximity, so I used a tripod to allow slower shutter speeds.
The 10 – 20 mm lens proved to be the best for this location, producing this image:
ISO 200, 12 mm (18 mm equivalent 35 mm), f/4.5, 1/5 sec.
Distortion with this lens is unavoidable, but I’m willing to accept the diverging verticals in this image, as they don’t impact on the purpose of the shot. The wide angle also meant that the shop assistant wasn’t aware that he was in the frame, so a more natural image has evolved.
We can see the type of goods on sale with the fresh bread in the foreground, through the dried fruit on the counter and in the many storage jars to the Turkish delight and on to the cheese counter. The sales assistant looks as though he’s giving the right level of attention to the customer and his manner of dress shows the ‘easy’ atmosphere in the shop. There are other parts of the shop which I haven’t included here – displays of wine, coffee, pickles etc. and the clothing department – but I feel that I’ve captured the essence of the store with this image.
Monday, 29 October 2012
Project: Space and Function
Finding articles relating to the photography of the inside of buildings, with regard to how the spaces function, is not easy. Instruction on the photographing of architecture is much easier, but not what I was looking for. Some of the work of photographers in Magnum Photos
http://www.magnumphotos.com/ displays the kind of approach I wanted. In particular: Alex Majoli, October 2012 Paris Fashion Week where he uses figures within the spaces to bring life to the images; Bruno Barbey, Morocco Fes. 2012 where he has used different viewpoints to show the spaces used in the textile industry; Carl De Keyzer, Amsterdam Designers 2007 places subjects within their working environments; Chien-Chi Chang brings interiors to life in many of his images; Peter Marlow has several portfolios showing development interiors, mostly inferring that they are occupied without showing people; Susan Meiselas, Postcards from America III – House of Pictures, captures the spaces of a clothing factory with workers at their stations. Wayne Miller’s images show people in context with their surroundings, but the emphasis is on the subject, rather than the surroundings – not what I’m looking for just now.
Starting from the premise that I first need to know how to photograph the insides of buildings, I looked through my books and found one or two images which gave an idea of what to aim for:
In Michael Freeman’s ‘The Photographer’s Eye’ in the section ‘Perspective and depth’ there is an image of a cartographer’s library, which shows how the space is being employed.
While this is an example of the use of an image which used a tilt lens, the significance of the type of image is relevant to what I’m looking for. This image shows how the space is being used and tells a story of what is going on here.
We see areas where books and other reference items are stored, tables where the items can be worked with and people using it. This is the type of image I’d like to produce for the first exercise.
So, looking at this image, I need to consider perspective.
Another Michael Freeman book ‘Photographing People’, shows an example in the ‘workplace portraits’ section:
This is another example where perspective has been used to good effect. We see how the space is being used to fill the walls and provide a work area.
I suspect that a wide angle lens has been used here, as there is some distortion of the verticals in the image
John Hedgecoe’s ‘Complete Guide to Photography’ includes three projects relating to building interiors:
1. In the simple interiors section he addresses light. He advises that small, single source lighting from a window or open door may produce high contrast images, with the shadow areas showing very little detail. If additional lighting is to be used it should be diffused or reflected to create a soft light. Bouncing the light from a flash unit off walls, umbrellas or reflectors may be a possibility. If flash units are used, they should be well out of frame and softened.
2. For large-scale interiors (churches, courtyards etc.) it’s more difficult to provide additional lighting – it may be useful to use a tripod, with the camera triggered in ‘bulb’ setting then fire the flash at different areas – paint with light. Also, there’s a factor of deciding what to include in the shot – what can be included and what can be left out!
3. Including people in the image takes away the decision of what time of day to use for the image – the presence of the people defines when the image is to be captured. Here he extolls the advantage of working in Black and White, where the problems of colour cast due to different light sources is no longer an issue and it’s easier to use the high contrast from single light sources to create low-key atmospheric images like this:
The low light angle, with the camera positioned to cover the area from dark to light and with the sitter gazing into the light have produced an image which places the woman comfortably in her space. The room is so obviously part of the woman and vice versa.
High-key images can similarly be produced, in well-lit areas which make the space seem more open and less painterly.
A common theme throughout these examples has been the choice of lens, the aperture being used and the positioning of the camera:
· The two perspective images use a wide angle lens and obviously quite a small aperture, to attain the good depth of field and both with a fairly low shooting angle, which increases the perspective.
· The Black and White image looks to be a standard lens, as there’s no distortion or shortening of perspective. The camera position is a little higher, which creates good lines with the floor and light lines from the window to draw the viewer into the picture.
Norman McGrath’s ‘Photographing buildings inside and out’ has a wealth of information regarding equipment, planning, viewpoint etc. It’s a little dated, so suggestions on how to make B&W slides etc. can be taken with a pinch of salt, but much of the information is still valid. There’s a slant towards producing architectural images, but the technical nuances are worth considering.
On the subject of including people in architectural images he suggests that the size of the building has an impact on whether or not they should be included. For instance, in a small room, the inclusion of a person may shift the attention from the room to the person, which may not be the remit for the image. In a large area, the inclusion of people can give the space some perspective, or show the function of the building.
Looking on line for information, I found the following:
eHow website http://www.ehow.com/how_7803216_photograph-buildings-inside-out.html advises the following for photographing interiors:
1. Scout the inside of the building to find interesting or significant subjects to photograph. Mount the camera on a tripod after you found a good vantage point and put the camera in manual mode.
2. Take several shots with different settings until you reach a satisfactory exposure. Often photographers will have success when using window light to illuminate their compositions. Overexpose your image to let more light from the window into the scene.
3. Mount an external flash to your camera and aim it upward or backward for it to act as a fill light. Bouncing your flash off of a ceiling or wall will help to lower the contrast of the shadows cast by the window light. Adjust the power of the flash until the brightness of the fill flash is just slightly darker than the window light.
Not the most detailed or very useful advice!
The Photo.net website http://photo.net/learn/architectural/interior gives much better advice on photographing interiors. It’s quite a long article, so I won’t try to insert it here, but the main points are:
· Use a tripod, as indoor light is usually poor, compared to outdoors, and longer exposures are required.
· When using a flash for additional lighting, don’t use the built in flash – it won’t be powerful enough.
· If the only light is from a single window the image will be very contrasty, so additional lighting may be required. This may be from existing lights (but incandescent lamps may require changing for daylight lamps), or flash. Alternatively the colour balance can be compensated for using filters or adjusted later using computer software.
· To show whole rooms, wide angle lenses produce better results - preferably prime lenses which require less light. It may be an advantage to use a longer lens to pick out detail for some images. Another option may be to use a standard lens and then stitch the images together – this brings in more techniques both in the taking and processing of the image, but it’s worth considering.
· Including people in an image can bring the space to life and give the image some meaning.
· Look for images that are ‘different’ or have some humour – have fun!
Using the various sources of information I’ve compiled a list of points to consider when photographing interiors:
· Perspective
· Light
· Lens
· Aperture
· Inclusion of people
· Shooting angle
· Look round the building for interesting angles and subjects
· Have a ‘planning’ visit and ask permission!
So with these points in mind, I’ll get onto the next exercise.
Sunday, 14 October 2012
Assignment 2 – People and activity
The Plan:
With the Whitby Folk Festival running I’m going to focus on the various dance groups, using these different groups performing their traditional dances.
Referring to the lessons of this second part, I’m looking for images which show the dancers and activities and capture ‘the moment’ as much as possible, whether in the dance, their actions or intimate moments.
I’ll use one camera (Nikon D300s and one zoom lens (Nikor 18 – 200 mm VR) to make it easier for the grab shots while giving the facility for longer range ‘personal’ images.
The reality:
Finding out where the dancers were going to be over the weekend was fairly easy, using the events listing. I was already reasonably familiar with some of the groups, so I knew what I was targeting. Getting into an optimum position while not getting into the performers’ way or being in danger of getting struck by flying sticks or trampled underfoot was more difficult. There were several venues with simultaneous displays, so I chose those which had more ‘colourful’ groups and got to the venue before the dancers.
For the ‘action’ shots, I used continuous focusing and high speed continuous shooting, to enable catching ‘the moment’ that froze the action at various points of the dance. This inevitably produced hundreds of images and while I was able to review them on camera to a degree the majority of the editing was done at home using Lightroom 4.
A problem I had with many of the group images was the number of onlookers, who produced too much ‘clutter’ in the images, so a significant amount of work was required to reduce this clutter using Photoshop – I’ll document this as the images are presented.
Starting with the ladies’ teams, I took the following series of images:
Camden Clog
ISO-200, f/8, 1/500 sec, 29 mm (43mm EFL)
This image of the Camden Clog dancing team, from South East Lancashire, catches the ladies as they were all in step, with their right feet all off the ground, their arms at the same position and hands at head height. It shows the practiced steps of this really ’tight’ team – obviously well-rehearsed and committed to performing traditional clog dances. Their attire is obviously well kept, with well-polished clogs and bells. They are to be admired.
I chose a low shooting angle for this in order to frame them better with parts of the harbour showing behind them. This is one of the images where I selectively blurred some of the background in order to bring the focus onto the ‘sharp’ dancers.
I think the moment of action has been caught well here and the processing of the image has worked fairly well. Obviously it would have been better to capture them without the need for further processing, but in this kind of situation one needs to be fast and catch the image as it’s presented – getting to the front of a crowd of spectators and keeping out of their viewing area is a feat in itself – so I’m quite happy with this result.
Hexhamshire Lasses
ISO-200, f/8, 1/500 sec, 35 mm (52mm EFL)
This group of traditional dancers, from Northumberland, is obviously very well-rehearsed. Again they’ve been caught in mid step as the lines dance towards each other. What is seen in this image is the joy of the dancers. They are so obviously enjoying the dance and each other’s company – and surely this is what the dance should be about! The footwear here is high heeled, traditional dancing shoes, rather than the clogs seen in the previous image (although they do perform clog dances too). They Hexhamshire Lasses have been in existence for 20 years and their impeccable dress and display are testament to their dedication. Their musicians are impressive too!
A very low shooting angle was used here as I wanted to accentuate the height of their dance steps, as well as put them in context with the venue. Using a focal length close to ‘standard’ has prevented distortion which could have occurred at this low angle. Again, I used Photoshop to selectively blur the background distractions in order to separate the dancers from the ‘clutter’.
Apart from the post processing needed, I think this image worked well – it captures the essence of this group – perfection in their pastime and sheer joy in its execution.
Martha Rhodens Tuppenny Dish
ISO-200, f/4.8, 1/2500 sec, 50 mm (75 mm EFL)
This team work closely with the Shropshire Bedlam (who’ll be seen later), performing ‘Border Morris’. They have been in existence for 40 years and perform their own interpretation of previously neglected dances, providing each other with musical accompaniment and support as they travel together to various displays.
I like this image, which is almost ‘cheeky’ but highlights the fact that every item of clothing is prepared and presented meticulously. Of all the ladies teams of the festival I think these are my favourite, mainly because of their obvious enjoyment of the craft but also of their easiness of working together. This shows a much more graceful side to the traditional ladies’ dances.
I used a low shooting angle and again, and a lens setting which produced no distortion - although the perspective has been shortened slightly. In this case I used a much wider aperture which meant much less post processing work as the background was already thrown out of focus. The backdrop of the cargo shed could be better, but I had to be in this position to catch the dance.
Fool’s Gambit Morris
ISO-200, f/11, 1/200 sec, 20 mm (30 mm EFL)
This group of young dancers performs a type of traditional Morris dance, usually danced by men. They are precise in their following of the dance steps and dress, so they’re preserving this type of dance as exactly as possible. Good for them. Personally I prefer a little more interpretation and excitement.
I think this image shows the exactness of their style, capturing them all in mid jump and all with an almost exact pose.
The relatively low shooting angle has accentuated their height from the ground well. I made the mistake of using a smaller aperture, which introduced a lot of distractions from the crowds and surroundings – this was treated using selective blurring in Photoshop, which I think produced a reasonable end result. There was also some distortion in the original image, but cropping and some perspective adjustment corrected this.
Shropshire Bedlam 1
ISO-200, f/11, 1/100 sec, 200 mm (300 mm EFL)
The next images are of this exciting, energetic group of dancers who perform a really masculine dance which is loud, fast and macho. This image of the youngest member of th team captures the movement as they race past. Obviously this dancer was aware that I was photographing him, but it wasn’t a problem. It’s interesting to note the line of sweat running down his face. This style of dance is hard work!
Using a longer lens I’ve captured a more intimate moment of the dance. I wanted to capture some of the movement, but the speed of the dance meant that 1/100 sec was the best I could do while still keeping the subject in reasonably sharp focus. I’m not completely happy with this image – it’s not sharp enough due to the speed of the dancer. I could have changed my ISO setting or a wider aperture to allow a faster shutter speed, but that would have lost some of the movement. It’s one of those quandary moments, so I took the middle ground with reasonable focus and a degree of movement.
Shropshire Bedlam 2
ISO-200, f/5.6, 1/1250 sec, 170 mm (255 mm EFL)
The force exerted by the dancers as they clash sticks isn’t to be underestimated. They could do some serious damage. Catching the moment as the sticks are struck by members of the team and seeing the concentration and almost malevolence in the faces of the dancers wasn’t easy.
Choosing a low shooting angle from a reasonable distance caught this image. Here I wanted to freeze the action, so a much faster shutter speed was used. I enhanced the image using single frame tone mapping. Without the tone mapping his blackened face had little detail. I think this treatment worked well for this image.
Shropshire Bedlam 3
ISO-200, f/4.8, 1/1600 sec, 60 mm (90 mm EFL)
This image gives an indication of the energy of this group. I used to think the Morris dancers were somewhat effeminate until I saw these guys in action – They’re strong and fit and they mean business. Woe betides anyone who gets in their way. I kept a discreet distance!
Again the low shooting angle and relatively high shutter speed has captured this moment in the dance. I was unhappy about cutting out the feathers on the hat of the front dancer, but accepted this as the rest of the image was good. Catching this moment and every part of the dancers, bearing in mind the speed of the dance, would come down to luck in many cases. This is another image which I treated with single frame tone mapping, to bring out the detail in their faces and costume. I think the end result warrants the treatment.
Shropshire Bedlam 4
ISO-200, f/5.6, 1/400 sec, 135 mm (202 mm EFL)
The rigours of energetic dancing on a warm day have produced a lot of sweat which has washed the black from his face. His eyes are red from the salt and even the feathers and tassels of his costume seem to be flagging. But look at the happiness and satisfaction in his face. I think this is one of the best ‘moments’ I’ve captured in this set.
All I needed to do with this image was crop some of the background (too much building was showing).
Ouse Washes Molly Dancers 1
ISO-200, f/5.6, 1/250 sec, 200 mm (300 mm EFL)
Another blackened face from a member of this group from the fens. They have very different costumes – portraying their Sunday best or what to wear for a garden party, because traditionally these dances would be performed in their leisure time for entertainment. This troupe performs ‘molly’ dances which tell stories of murder and mystery. This is the leader of the group and he’s here waiting for their turn to perform. He’s watching every step of the team that’s now dancing with such concentration. The face black is fresh and unspoiled, without even a smudge on his spectacles – this won’t last long.
Picking his face out in the crowd, with other members of his team in the background, shows the seriousness of the show they’re going to perform. The show will be entertaining and enacted to a very high standard which only this kind of concentration will produce it. It’s a momentary prelude to a moment if you like!
I’m pleased with this image. I like the short depth of field and the subject’s separation from the background. All I needed to do was converting it from RAW and resize the image for the different media applications.
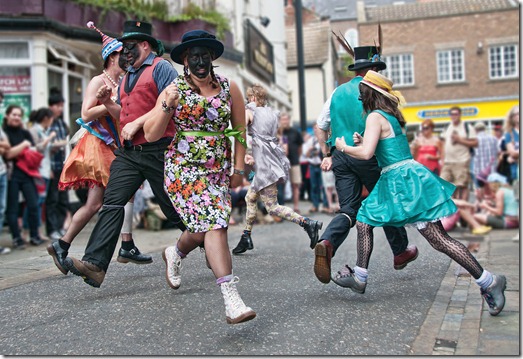
Ouse Washes Molly Dancers 2
ISO-200, f/3.8, 1/1000 sec, 24 mm (36 mm EFL)
Performing this dance (or tale) shows the dancers’ commitment to the art. They’re apparently charging off in different directions, but look at the precision – they’re all in perfect step, the directions of travel are exact (or they’d be running into each other) and they’re obviously enjoying what they’re doing.
I think the moment has been well caught, with all members off the ground. Another typr of moment is seen in their happy faces, while the street setting gives them a sense of time and place.
Although the depth of field in this image was relatively short, I still used Photoshop for selective blur in parts of the image, to reduce the impact of the crowd ‘clutter’. I’m still happy with the end result and I think the treatment shows the dance troupe to good effect.
The sequence of images has shown different groups performing their folk dances in different ways, but generally all to the same end and at the same event. Close up images of some of the players have helped show the dedication these dancers have to the tradition and to the enjoyment they obviously have in the performance. I’ve really enjoyed the experience.
Tuesday, 25 September 2012
Books and websites referenced during this section:
Books:
Angier, Roswell. 2007 – ‘Train Your Gaze’. 1st edition, Switzerland, AVA Publishing
ISBN 2-940373-37-X
Fox, Anna and Caruana, Natasha. 2012 – ‘Behind the image’. 1st edition, Switzerland, AVA Publishing. ISBN 978-2-940411-66-5
Freeman, Michael. 2004 – ‘Photographing people’ from the ‘Digital Photography Expert’ series’. 1st edition. UK, Ilex. ISBN 1-904705-20-0
Hedgecoe, John. 2004 – ‘Complete Guide to Photography’. 3rd edition (first published 1990). UK, Collins & Brown. ISBN 1-84340-119-3
Howarth, Sophie and McLaren, Stephen. 2011 – ‘Street Photography Now’. 1st paperback edition (first published 2010). UK, Thames and Hudson. ISBN 978-0-500-28907-5
Langford, Michael; Fox, Anna; Sawdon Smith, Richard. 2010 – ‘Langford’s Basic Photography’. 9th Edition (first published 1965). UK, Elsevier (Focal Press). ISBN 978-0-240-52168-8
Szarkowski, John. 2009 – ‘The Photographer’s Eye’. 4th edition (first edition 1966). New York.
Museum of Modern Art. ISBN 978-0-87070-527-4
Websites:
Cruel and Tender: Photography and the real – teacher and guides’ kit – Available from: http://www.tate.org.uk/search/cruel%20and%20tender
[Accessed 22nd June]
Nick Turpin on Street Photography:
http://www.sevensevennine.com/
[Accessed 9th August]
Magnum Photos
[Accessed 18th August]
Steve McCurry’s blog
http://stevemccurry.wordpress.com/
[Accessed 18th August]
Photography Mad tips regarding standard lenses.
http://www.photographymad.com/pages/view/standard-lenses
[Accessed 21st August]
Urban 75 advice on the rights of photographers
http://www.urban75.org/photos/photographers-rights-street-shooting.html
[Accessed 12th September]
Photography Laws, Copyright and Trespass
http://stirlyn.co.uk/photography-laws-copyright-and-trespass/
[Accessed 12th September]
Media:
Fasal Sheik’s website reference to his photograph ‘A camel for the son’
http://www.fazalsheikh.org/projects/a_camel_for_the_son/description.php
[Accessed 22nd June]
Video of the book ‘Cruel and Tender: Photography and the real – low quality but a reasonable overview. Available from:
http://vimeo.com/channels/ls1/16978071
[Accessed 22nd June]
Tate gallery – August Sander images
http://www.tate.org.uk/art/artworks/sander-beggar-al00107
[Accessed 22nd June]
History today – Don McCullin image of a Turkish Cypriot woman
http://www.historytoday.com/blog/2011/10/shaped-war-photographs-don-mccullin
[Accessed 23rd June]
Cleary Gallery blog for Dorothea Lange image ‘Migrant Mother, Nippomo, California’, 1936
http://clearygallery.blogspot.co.uk/2012/05/photographic-mother-day.html
[Accessed 23rd June]
Nick Turpin’s ‘Seven seven nine’ on Street Photography
http://www.sevensevennine.com/
[Accessed 13th August] also the Insight film available from sevensevennine via Distrify at https://distrify.com/
Publications used in this section (not necessarily referenced in the texts but including those above):
Angier, Roswell. 2007 – ‘Train Your Gaze’. 1st edition. Switzerland, AVA publishing SA
ISBN 2-940373-37-X
Badger, Gerry. 2010 –The Genius of Photography. 1st edition. UK, Quadrille Publishing Ltd
ISBN 978-1-84400-609-0
Cotton, Charlotte. 2009 – ‘the photograph as contemporary art’. 2nd edition (First published 2004). UK, Thames and Hudson. ISBN 978-0-500-20401-6
Dyer, Geoff. 2007 – ‘The Ongoing Moment’. First edition. USA, ISBN 978-1-4000-3168-9
Freeman, Michael. 2003 – ‘Light & lighting’ from the ‘Digital Photography Expert’ series’. 1st edition. UK, Ilex. ISBN 1-904705-21-9
Freeman, Michael. 2004 – ‘Photographing people’ from the ‘Digital Photography Expert’ series’. 1st edition. UK, Ilex. ISBN 1-904705-20-0
Freeman, Michael. 2006 – ‘The Complete Guide to Light & Lighting in Digital Photography’.
1st edition. UK, Ilex. ISBN-10 1-904705-88-X
Hedgecoe, John. 2004 – ‘Complete Guide to Photography’. 3rd edition (first published 1990). UK, Collins & Brown. ISBN 1-84340-119-3
Howarth, Sophie and McLaren, Stephen. 2011 – ‘Street Photography Now’. 1st paperback edition (first published 2010). UK, Thames and Hudson. ISBN 978-0-500-28907-5
Langford, Michael; Fox, Anna; Sawdon Smith, Richard. 2010 – ‘Langford’s Basic Photography’. 9th Edition (first published 1965). UK, Elsevier (Focal Press). ISBN 978-0-240-52168-8
Shore, Stephen. 2007 – ‘The Nature of Photographs’. 2nd edition. UK, Phaidon Press Ltd.
ISBN 978-07148-5904-0
Szarkowski, John. 2009 – ‘The Photographer’s Eye’. 4th edition (first edition 1966). New York.
Museum of Modern Art. ISBN 978-0-87070-527-4