People and Place

This blog is for the learning log and assignments for the third OCA course - People and Place

Thursday 28 February 2013

Exercise 4.05 – Selective processing and prominence

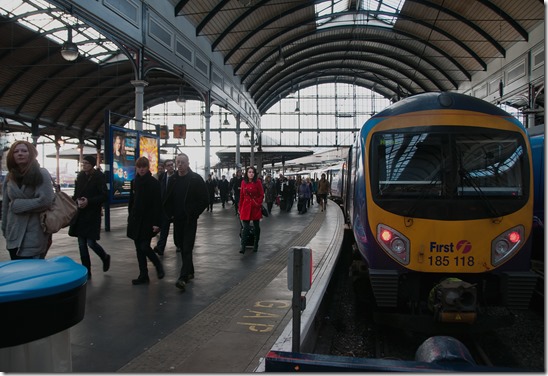
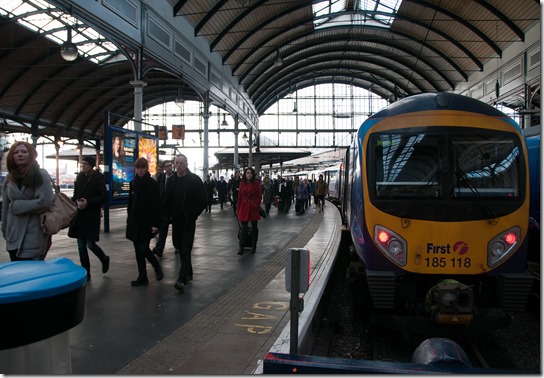
Starting with an image taken in Newcastle Railway station for Assignment 3 I wanted to bring out the lady in red walking down the platform. The image was captured with one stop underexposure to freeze the movement of the arriving passengers and to reduce the highlight clipping from the sky. This is the original image:

Exercise 4.05 01

In Photoshop I duplicated the layer and on the top layer I selected the lady in the red coat, before using a selective colour adjustment layer to increase the cyan and darken the red.

I then deselected the lady and applied Nik Viveza 2 filter to increase the saturation and structure of the new layer, thereby giving the resultant image more clarity, contrast and vibrance.

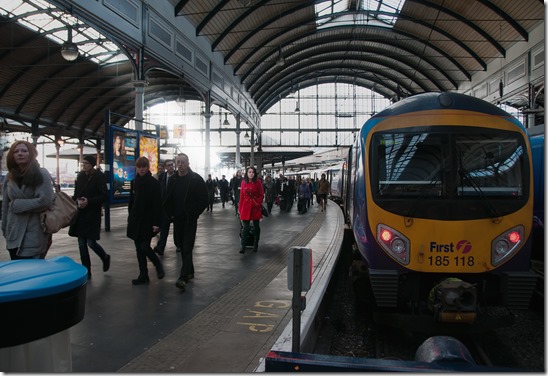
Having made these changes I then used a layer mask to take the lady in red back to the darkened layer below. The lady now blends in with the rest of the crowd:

Exercise 4.05 02

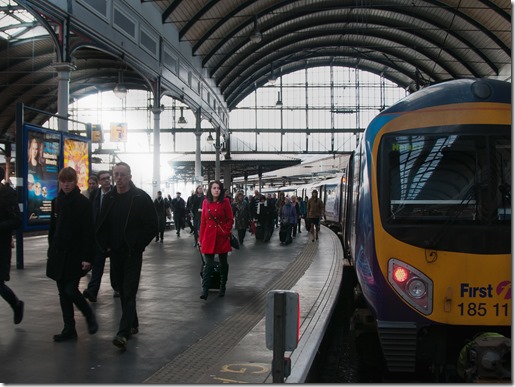
Taking the original image into Photoshop again I treated it with Nik Viveza 2 to increase the structure and saturation of the whole image. With this top layer selected I used Alt > create layer mask, to create a black mask to hide the layer and painted the lady back in using a white brush.

I then selected the original layer and applied a curves adjustment layer to flatten and darken the original, leaving the lady to stand out from the crowd.

To enhance the effect further I duplicated the top layer with its layer mask and used ‘screen’ blending mode at 65% opacity to give the lady more brightness and vibrance. The lady now stands out from the crowd:

Exercise 4.05 03

I know I’ve been a little extreme with the treatment here, but it’s really to emphasize what can be done. In some situations this may be an acceptable level of alteration.

Taking it a little further, I’ve created a beam of sunlight to make the brightness of the lady a little more acceptable:

Exercise 4.05 04

This was done by selecting the area to be lightened with the polygonal lasso tool, using a large feather (40 pixels) then increasing the exposure in the selected area. Some areas of the selection were returned to normal using a layer mask.

Further adjustments were made by simple cropping:

Exercise 4.05 05

As I said earlier, it’s a matter of how far you want to go. I think this is far enough for this application.

Project: Special processing

There is so much software available now which makes alteration of images very easily. Even the basic Photoshop programme (I’m using CS6 extended) has a wealth of filters / bending modes / selection and masking tools etc. but when plugins are considered the world’s an oyster!

I use Nik, Topaz Labs, On-one, Alien Skin, Flaming Pear, Photomatix and Redfield plugins, so plenty of scope for amending images.

There are applications which, when used in moderation can really enhance an image, but overusing them can change them beyond recognition. They can be used with their presets or as customized settings and then blended together in all sorts of ways. It’s really a matter of what you would like to do and how far to take it. These are obviously the user’s personal preferences and may not be what a potential customer wants, so the options should be discussed with the client before the photograph is processed.

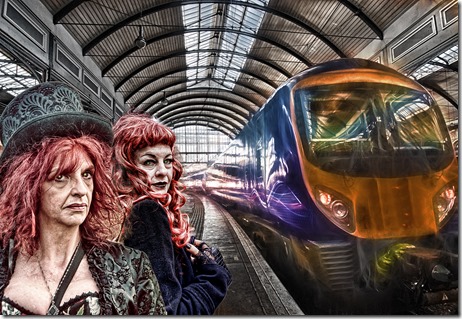
In the days of film, I always found my darkroom to be the most enjoyable part of photography. Having moved into the digital age I still enjoy this aspect of it, particularly the manipulation of images and have had some success in ‘creative’ exhibitions – here’s an example of what can be done with an image of Newcastle Railway Station (taken for assignment 3), a pair of Goths and some extreme processing:

Exercise 4.05

It’s doing quite well for me, but this is not necessarily the requirement for all types of photography and I think this course needs a more restrained approach, which is how I’ll treat the next exercise.

Exercise 4.04 – Balancing figure and space

I had problems with the weather when planning this exercise. When there’s a North Easterly wind blowing with temperatures just above freezing there are very few people venturing out. On this day the wind had eased slightly so I hoped I’d find someone walking on the pier.

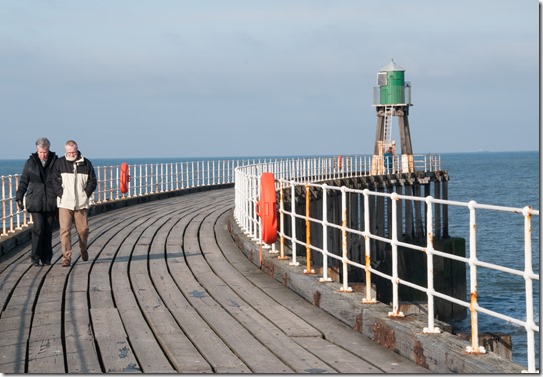
The first image shows a couple walking back from the end of the West pier at Whitby:

Exercise 4.04 01

Nikon D300s, ISO-200, 18-200 VR Nikkor lens, 82 mm (123 mm EFL), f/18, 1/160 sec.

Although the couple is obviously a major part of the image the eye is still drawn by the curved boards to the lighthouse at the end. This was affected by framing the couple in the far left of the image, leaving the majority of the frame for the pier.

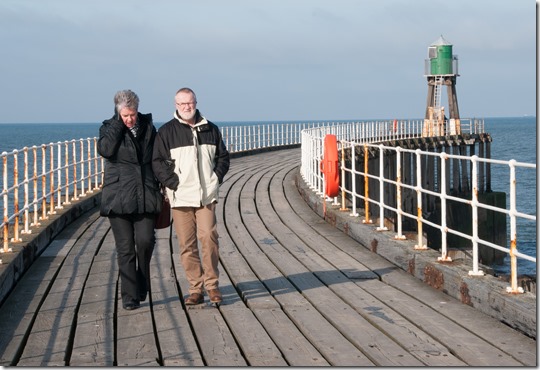
In the second image, the couple had to move nearer to the centre of the frame – there was an idiot with a tripod blocking the side of the boardwalk.

Exercise 4.04 02

Nikon D300s, ISO-200, 18-200 VR Nikkor lens, 65 mm (97 mm EFL), f/18, 1/160 sec.

The walkers are now much more prominent in the frame – not only because they take up more of the image, but because they are more central. This image is now about the couple rather than the pier. Their expressions tell us that they’re not really enjoying the experience – I think the wind chill must have dropped the temperature to around –35 Deg C !

So it’s clear that composition can make a real difference on what the prominent features of an image will be.

Project: A matter of balance

As stated in the course material, this balance between figure and space is down to experience; consequently it’s difficult to find instruction in other documents. There are obviously things that can make a difference to any image. For instance the composition of an image takes into consideration, colour, shape, contrast (not only tonal), lenses, camera settings etc. – looked at in ‘The Art of Photography’ module.

Michael Freeman’s book ‘The Photographer’s Eye’ contains lots of advice in the balancing of elements in an image in the ‘Design Basics’ section where he addresses balance; dynamic tension; figure and ground; rhythm; perspective and depth; visual weight etc. Obviously taking these points into consideration will have an impact on the positioning of a person in any space. This positioning will alter the ‘weighting’ in the scene, either towards or away from the person.

Another of Michael Freeman’s books – ‘Photographing People’ has the section ‘Daily Life’ with the subsection ‘Framing the figure’ where he looks at the impact of positioning the figure in the image.

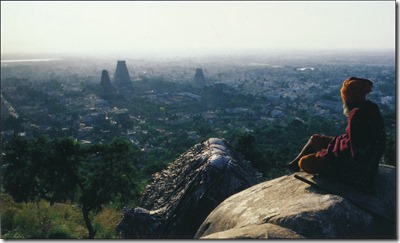
Exercise 4.04 1

With the person positioned to the side and looking away from the camera, the eye is directed to the temple in the distance.

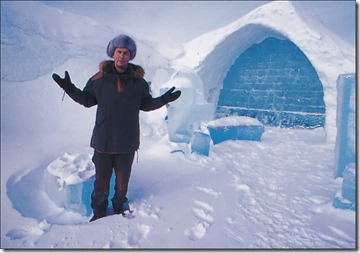
Exercise 4.04 2

With the person positioned nearer the centre and looking towards the camera, he becomes the main object of the image.

So obviously the position of the person in the frame has an immense effect on where the eye is directed.

Other factors which should be taken into consideration are:

The size of the person relative to the frame – obviously if a person takes up a larger part of the frame, he / she will have more of presence in the image and vice versa.

The depth of field for the lens – if wide aperture is used, then a short depth of field is created which then throws the background out of focus, leaving a person in the foreground more prominent.

Lighting in the image can change the prominence of either the background or the foreground, particularly if using additional lighting or reflectors, and natural lighting for the chiaroscuro effect. See Michael Freeman’s ‘The Complete Guide to Light and Lighting in Digital Photography’.

The colour and contrast of an image can change the prominence of a person. Consider the image above, where the man in the snow is wearing dark clothes against an almost white background. This strong contrast makes the person stand out more.

So there are lots of criteria that will influence the presentation of people in an image. I’ll keep them in mind when photographing for the next exercise.

Thursday 21 February 2013

Exercise 4.03 – Making figures anonymous

Leading on from Chris Steele-Perkins’ Kings Cross we again visit York Railway Station.

Exercise 4.03 01

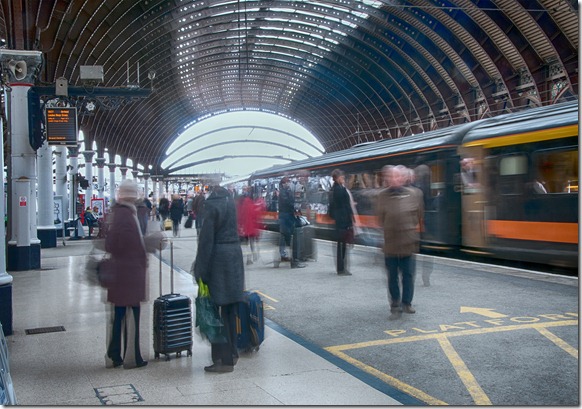
Nikon D300s, ISO-200, 18-200 VR Nikkor lens, 32 mm (48 mm EFL), f/25, 1.6 sec.

Motion blur and people facing away from the camera are used here to show the movement of passengers and the busyness of the station as the train from Kings Cross arrives.

Treated with single frame tone mapping to remove the highlight clipping, this image uses motion blur – affected by using a slow shutter speed – while utilizing the people in the foreground who are looking away from the camera. This makes all the people anonymous in the image, but shows how they interact with the events of the station. The motion of the arriving train also helps this impression.

Moving on to Fountains Abbey and Studley Grange, the next image uses groups of people to give a sense of scale and to show how the space is used.

Exercise 4.03 02

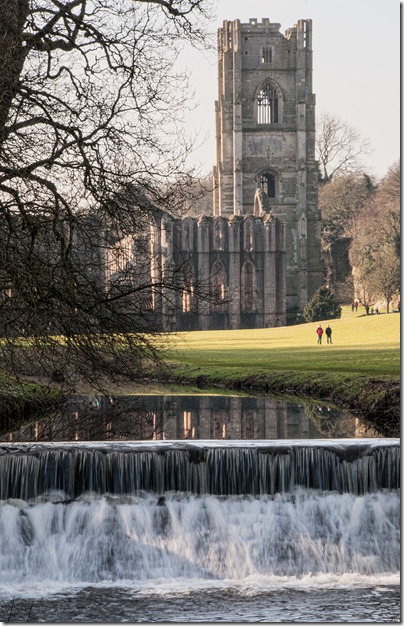
Nikon D300s, ISO-200, 18-200 VR Nikkor lens, 105 mm (157 mm EFL), f/32, 1/13 sec.

A small aperture with a relatively slow shutter speed was used to give a long depth of field and show the movement in the water for this image. The people in the image give a sense of scale to the ruins of the abbey and a feeling of calmness as they stroll in the winter sunshine.

Further down the river, a wider lens setting is used while the lady in the image looks towards back towards the abbey.

Exercise 4.03 03

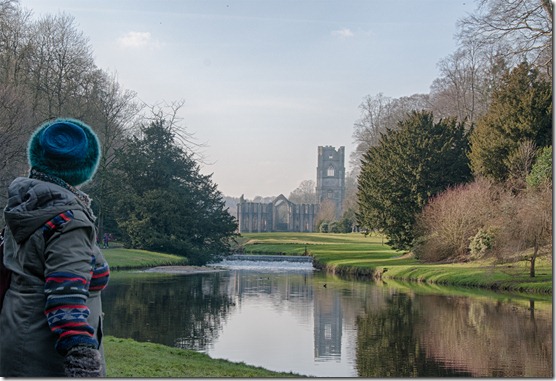
Nikon D300s, ISO-200, 18-200 VR Nikkor lens, 48 mm (72 mm EFL), f/13, 1/100 sec.

With her head turned away from the camera and her positioning in the frame the eye is directed to the abbey which is reflected in the river. The inclusion of the lady not only gives the image some depth, but brings ‘life’ to the scene.

Moving to the nearby Brimham Rocks we include people in a different way:

Exercise 4.03 04

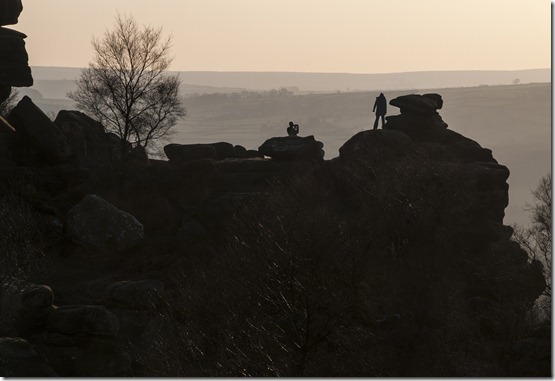
Nikon D300s, ISO-200, 18-200 VR Nikkor lens, 112 mm (168 mm EFL), f/25, 1/80 sec.

The techniques of silhouette and size of the people, as they look at the sunset over Nidderdale from one of the outcrops, are used in this image. The people are an important part of the image, but their anonymity enhances the scene.

With one stop underexposure some of the foreground detail is lost, but the effect of the silhouette of the rocks and the people in this image make the photograph much stronger.

This exercise has made me appreciate the advantage of including people in landscape images. It puts a different perspective on a view, bringing it to life and directing the viewers’ attention to what they are really looking at.

Project: People – unrecognisable

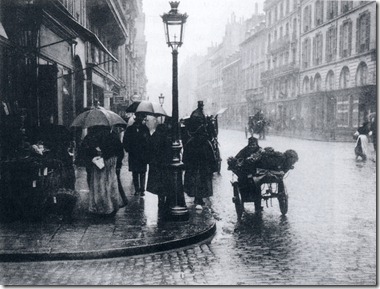
Using people to suggest usage of a place is not a new thing. Many examples can be seen in relatively old photographs. In ‘Street Photography’ by Clive Scott we can see Maurice Bucquet’s ‘Rainy Day in Paris’ from c.1898

Exercise 4.03 1 Bucquet

By shooting into the light he has used silhouettes to make the people anonymous, so directing the viewer to look at the street. The group of people also make the individuals anonymous.

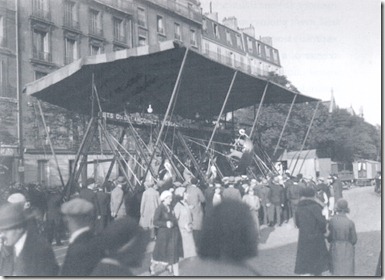
Marcel Bovis’ ‘The Swings at Denfert-Rochereau’ (1931) also mixes techniques to make the people anonymous.

Exercise 4.03 2 Bovis

Here he uses motion blur and crowds to put more emphasis on the swings.

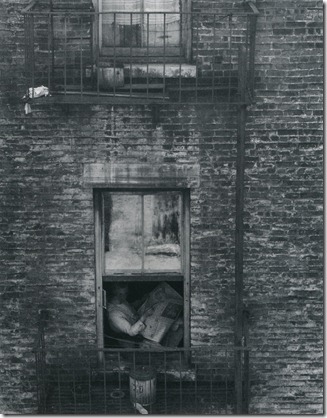
In John Szarkowski’s ‘The Photographer’s Eye’ Edward Steichen’s ‘Sunday Papers’ (c.1922) is shown.

Exercise 4.03 3 Steichen

The person’s anonymity is achieved by obscuring the face as the head is turned away.

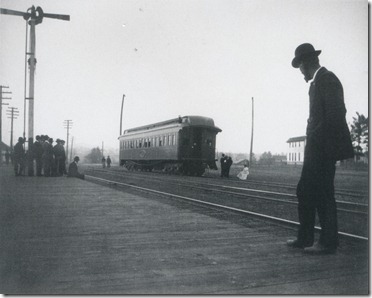
Charles J. Van Schaick also uses a combination of techniques in ‘Special Car of Travelling Minstrel Show’ (c. 1905).

Exercise 4.03 4 Van Schaick

Here he uses a group in the distance and the man in the foreground to point the way to the rail car, so the techniques of ‘small and many’ and ‘facing away’ are used to good effect here.

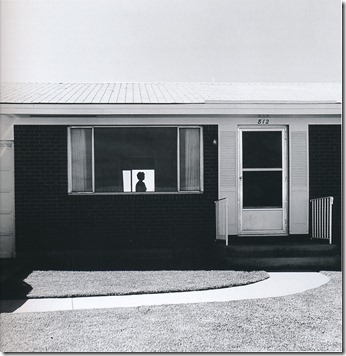
‘The Genius of Photography’ by Gerry Badger shows an excellent example of ‘silhouette’ in Robert Adams’ photograph below:

Exercise 4.03 5 Robert Adams

The framing of the woman in the square of light brings the dwelling to life. Without the silhouette the house against the clear sky would be nothing. With the silhouette it’s a place that’s lived in and also a powerful piece of art.

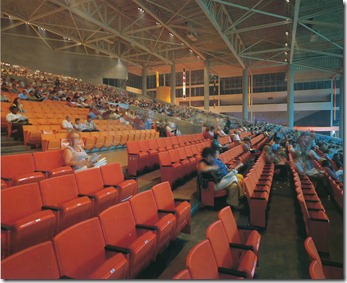
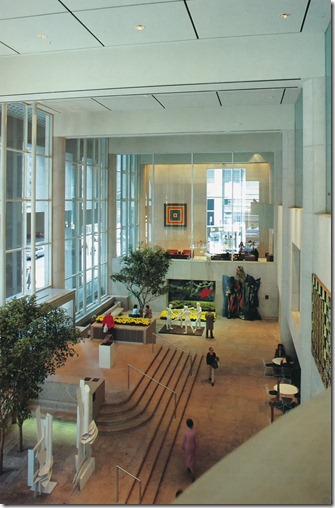
Norman McGrath’s ‘Photographing buildings inside and out’ has several images where people have been used to make the buildings ‘live’. I’ve chosen two which demonstrate some of the techniques addressed in this section.

Exercise 4.03 6 McGrath

In this first image he’s used a slow shutter speed because of the relatively low lighting. The effect is ‘motion blur’ caused by the movement of people during the exposure. This effectively makes the people unrecognisable while the seating of this hall is shown crisply.

Exercise 4.03 7 McGrath

This image demonstrates the use of ‘small and many’ people in an image, to show the scale of an interior. Their size within the image is so small that their faces are unrecognisable, but their inclusion gives the building a sense of use as well as size.

Looking online, the following websites were of interest:

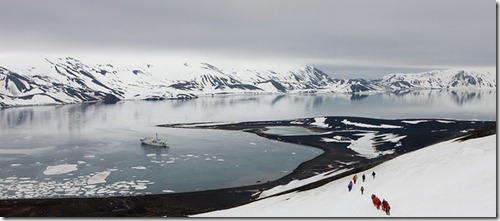
http://www.adamburtonphotography.com/gallery Adam Burton is a renowned landscape photographer and while the majority of his images are landscape panoramas, the odd ones are enhanced by the inclusion of people:

Tourists hiking down the mountainside towards Whalers Bay, Deception Island, South Shetland Islands, Antarctic Peninsula, Antarctica

Heading Home – Deception Island, Antarctica

The inclusion of the group of people ‘small and many’ brings colour to an otherwise almost colourless landscape. This inclusion doesn’t detract from the landscape, but gives it ‘life’ and scale.

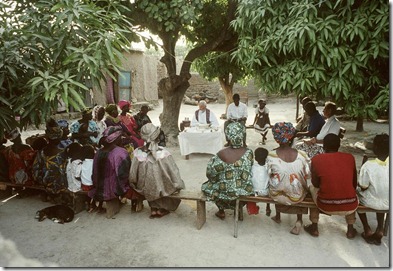
Looking at the Magnum website and at the work of Abbas, there are several examples where he makes the people anonymous to portray the usage of a space. In his Mali Catholic Missionaries, 1994 we see this celebration of mass

Exercise 4.03 09 Abbas

Although the majority of the congregation is facing away from the camera, there is no doubt of the way this space is being used.

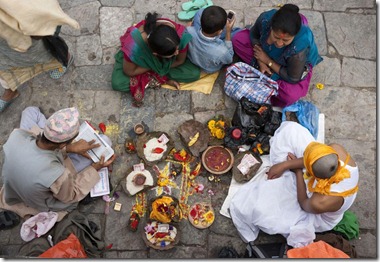
In his Nepal collection we see the Brahmin priest performing a ritual in a Hindu temple, to the memory of a deceased.

Exercise 4.03 10 Abbas

Using a high viewpoint the participants’ faces are hidden from view, directing the viewer to the way the space is being used.

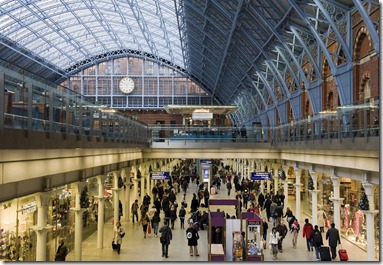
Chris Steele-Perkins’ image of Kings Cross Station uses the crowds to show the way the station is being used:

Exercise 4.03 11 Steele Perkins

Although the crowds are the main way in which the anonymity is used, there’s also a degree of motion blur as well as people facing away from the camera.

We can see from many of these images that more than one technique is being used in individual photographs. I’ll bear this in mind when shooting the next exercise.

Friday 15 February 2013

Exercise 4.02 – Busy traffic

‘Street Photography Now’ by Sophie Howarth and Stephen McLaren has many examples of busy situations. Of note are the following:
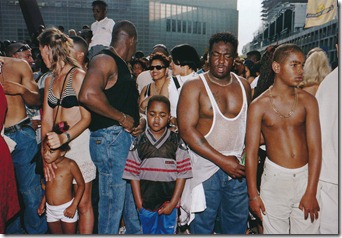
Exercise 4.02 1 snoek

Street scenes of Rotterdam by Otto Snoek.

Here he catches the moments of people as they rush through their busy days. He freezes the movement, using higher shutter speeds and flash.
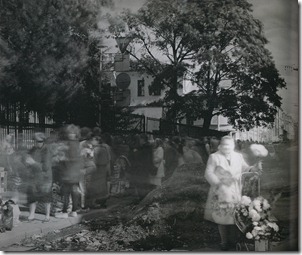
Exercise 4.02 2 titarenko

Alexey Titarenko’s images of St Petersburg show the movement of people with the opposite technique, using slow shutter speeds to record their travel.

In Michael Freeman’s ‘The Photographer’s Eye’ there are other examples of busy traffic:
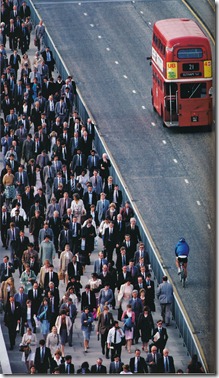
Exercise 4.02 3 busy street

The ‘busyness’ of this image is shown by the perceived movement of the people and the density of the moving crowd. It’s accentuated by the bus and the cyclist travelling in the opposite direction and the space on which they are travelling.

Obviously the perceived movement is what gives this image its impression of a busy crowd, but also it needs to have a reference, which is not travelling in the same direction or is stationary.

All of these images have shown movement to imply ‘busyness’, so with this in mind I’ll look at what techniques can be used to give this impression.

There are various ways of portraying motion:

· Using motion blur, where a slow shutter speed is used while the camera remains fixed (often on a tripod)

· Freezing the motion by using a fast shutter speed – often with a higher ISO

· Panning to follow the moving object so that the background becomes blurred giving the sense of the object’s motion

· Stroboscopic photography is an interesting method, but not one I’m going to try just now, although the results look good!

· Software can also be used to imitate motion – e.g. Photoshop motion blur / Alien Skin Eye Candy 6 – motion trails

Freezing the motion is probably the easiest method. Kevin Steele - http://kevsteele.com – uses this method for most of his ‘active lifestyle’ images. Sometimes a wide aperture is used, so the background blurs to accentuate the main subject’s movement, while other images have a good depth of field suggesting the use of higher ISO settings.

Images by Manuel Cafini - http://whodesignedit.net/photography/people-motion-manuel-cafini - show motion trails, caught by using a black background with his subjects wearing bright, well lit clothing and probably using a rear-curtain flash to freeze the subject at the end of a long exposure. This is motion blur with added punch!

Aaron Storey - http://www.pimshots.com/ - uses a variety of techniques: high shutter speed with a wide aperture, panning and motion blur to catch the motion.

Personally, I find the most attractive results are obtained using slow shutter speeds – I like the blur caused by the movement.

For this exercise I had to travel again –Living out in the sticks is wonderful, but if busy crowds are required then we need to go elsewhere. So this time I chose York. It has a reasonably busy railway station and photography is allowed, provided no flash is used – they do allow the use of tripods. All that is required is to sign in before starting, receiving a short safety brief and then signing out when you’re finished.
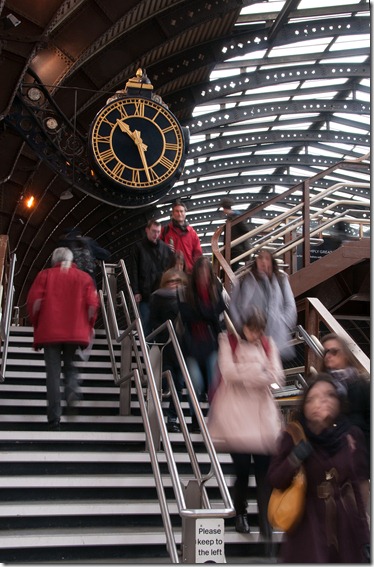
Exercise 4.02 01

Nikon D300s, 32 mm (EFL 48 mm), ISO-200, f/16, 1/3 sec

Having spent some time watching where people moved when a train arrived I positioned myself near the foot of the stairs from the bridge. It took several exposures to determine the best shutter speed – too long and the movement of people caused lines which didn’t show any features of the passengers; too short and there was no motion blur to be seen.

Using the tripod allowed the fixed items to be sharp leaving the movement of the passengers to create the motion blur.
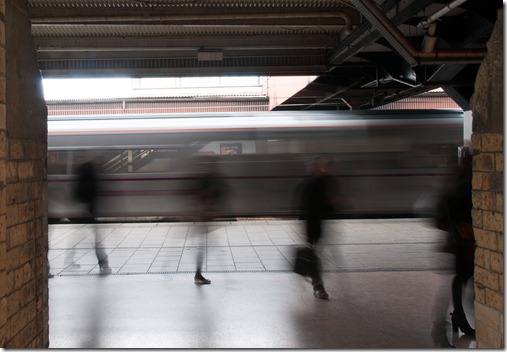
Exercise 4.02 02

Nikon D300s, 26 mm (EFL 39 mm), ISO-200, f/22, 1/2 sec

I took this one as passengers were arriving on one platform as a train was passing on another line. With the train travelling in the opposite direction to the people I thought their movement may be exaggerated. This shows the effect of using a shutter speed that is a little too slow – the passengers’ features are barely discernible. I like the image, but I don’t think it fills the criteria for the exercise.

Moving back into the shopping area of York I hoped to catch some excited shoppers – not to be at this time of year, but I was lucky enough to catch this image as a group of boys ran through Parliament Street.
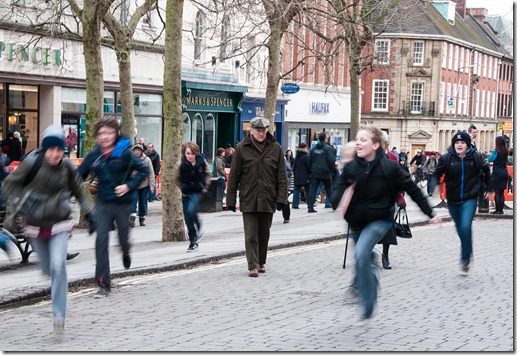
Exercise 4.02 03

Nikon D300s, 60 mm (EFL 90 mm), ISO-200, f/10, 1/25 sec

I was using the camera without a tripod here, so the aperture was reduced to allow faster shutter speeds. With the vibration reduction switched on a shutter speed of 1/25 sec is easily managed. The speed that the boys were travelling produced enough blur at this setting while the elder couple in the road and the rest of the scene stayed in reasonably sharp focus.

Using a faster shutter speed I captured this image in Scarborough on a Saturday morning – this is as busy as it gets there.
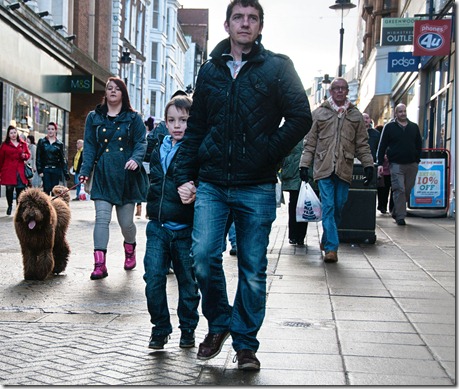
Exercise 4.02 04

Nikon D300s, 42 mm (EFL 63 mm), ISO-200, f/5.6, 1/200 sec

There’s a reduction in the depth of field at this setting, but it allows much faster shutter speeds, so it’s easier to catch the moment. I shot from a low angle to emphasize the legs – the dog was a bonus! I used single frame tone mapping to bring out detail in the dark areas, particularly the boy’s face and the dog. Shooting into the light would have given a high contrast result which I wasn’t looking for.
Wednesday 13 February 2013

Exercise 4.01 – A single figure small

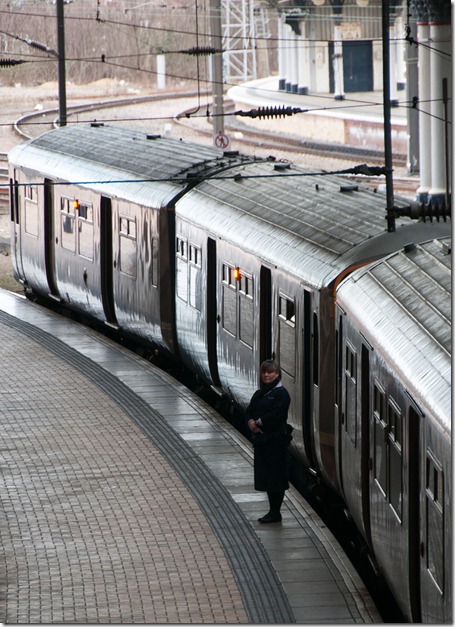
My first attempt at this exercise was in York station, capturing a guard on the platform as she waited for the train departure:

Exercise 4.01 01

Nikon D300s, 170 mm (EFL 255 mm), ISO-200, f/5.6, 1/50 sec

It’s surprising how the eye goes to the person, even though she’s such a small part of the image. Her uniform makes her very dark in the scene, but maybe it’s this contrast that makes her stand out more.

Looking for a situation where there’s lots of open space, with good contrast, I decided that the place to be was the cliffs above the beach at Whitby. It was just a matter of waiting for the right tide and lighting conditions. I wanted low tide with a relatively calm sea (to provide light areas of beach for the contrast and possibly reflections). It needed to be around midday to catch the little light that’s available at this time of year.

This area of the beach is a regular place for walking the dog. I didn’t want a day when there would be lots of tourists and this one fitted the bill – bright enough for the main image but cold enough to deter most people. Then it’s time to set up the tripod, wrap up and watch and wait.

Exercise 4.01 02

Nikon D300s, 500 mm (EFL 750 mm), ISO-800, f/22, 1/100 sec

I composed this image to leave the lady’s dog out of the frame (chasing seagulls) while taking care to miss out other walkers.

The camera was set at a high ISO to enable a reasonably fast shutter speed. I wanted to keep as much detail as I could in the majority of the image, so I kept the aperture relatively small.

The result is a high key image where the immediate attention goes to the walker. From there the eye can wander to see the water marks in the sand, the breaking waves and the sunlight further along the beach. In hindsight, I could have used a lower ISO and wider aperture for this image – I live and learn!